


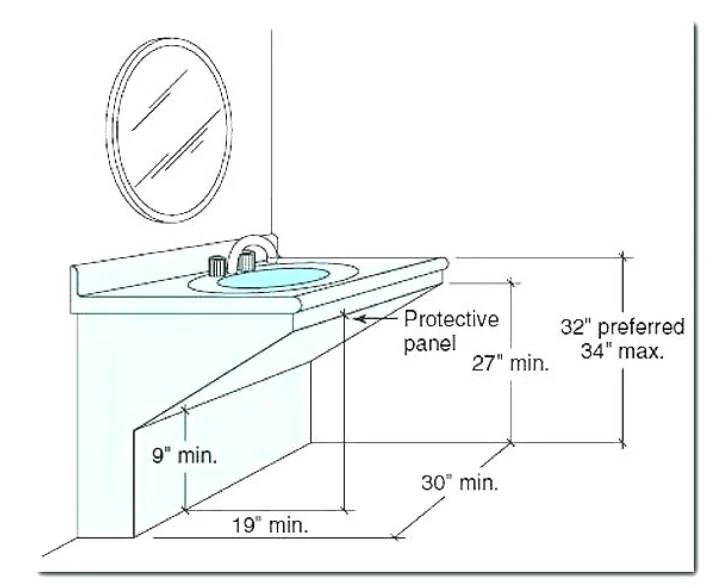
Selecting an accessible bathroom sink requires more than choosing a fixture with suitable dimensions. The sink, faucet, supporting structure, plumbing, and surrounding floor space all need to work together to create a practical and accessible installation.
This checklist can help architects, contractors, facility managers, and property owners evaluate ADA Compliant Bathroom Sinks before purchasing and installation. Reviewing these details early can help reduce design conflicts and costly modifications later.
1. Check the Sink Height
Start by verifying the finished height of the sink or countertop. Under the 2010 ADA Standards for applicable installations, the front of an accessible lavatory or counter is generally limited to 34 inches above the finished floor.
Measure the completed installation rather than relying only on the product’s advertised dimensions. Finished flooring, countertop thickness, mounting hardware, and other components can affect the final height.
2. Verify Knee Clearance
The space underneath the sink is essential for a forward wheelchair approach. The applicable ADA requirements specify minimum dimensions for vertical, horizontal, and lateral knee clearance.
Check whether the sink design, vanity, support brackets, shelves, and plumbing interfere with this space. A standard cabinet beneath the basin may eliminate the clearance required for an accessible installation.
3. Confirm Toe Clearance
Adequate toe space allows a wheelchair user to position closer to the sink. Review the depth and height of the area beneath the front and sides of the fixture according to the applicable accessibility requirements.
Structural supports and plumbing should not unnecessarily reduce this space. Use detailed installation drawings to confirm the available clearance before construction.
4. Measure the Clear Floor Space
The sink needs an unobstructed approach area. For applicable ADA installations, a clear floor space of at least 30 by 48 inches is generally required for a forward approach.
Check the complete bathroom layout rather than measuring the sink area in isolation. Doors, partitions, trash receptacles, toilets, and other fixtures can interfere with the required space.
5. Evaluate Faucet Operation
The faucet should be easy to operate without excessive force or complicated hand movements. Under the ADA Standards, applicable controls generally need to be operable with one hand without tight grasping, pinching, or twisting of the wrist.
Consider lever, push-button, or suitable sensor-operated designs based on the facility’s needs. Verify the manufacturer’s specifications for operating force and installation requirements.
6. Check Faucet Reach and Position
An accessible faucet should be within a comfortable reach from the user’s position. Its location should also allow water to flow effectively into the basin without creating unnecessary splashing.
For compact bathrooms, pay particular attention to the relationship between the faucet, backsplash, counter edge, and surrounding walls.
A faucet that technically fits the sink may still be inconvenient if its controls are positioned too far away.
7. Inspect Under-Sink Plumbing
Plumbing beneath an accessible sink should be coordinated with the required knee and toe clearance. Drainpipes and supply lines should not create unnecessary obstacles.
Where exposed plumbing could come into contact with users, hot water and drainpipes should be insulated or otherwise protected in accordance with applicable requirements.
Review plumbing drawings before installation to identify potential conflicts.
8. Consider the Sink Mounting Style
Different mounting configurations can affect accessibility and space efficiency.
Wall-Mounted Sinks
Wall-mounted models can provide open space beneath the basin and may work well in compact bathrooms. Confirm that the wall structure and mounting hardware can safely support the fixture.
Countertop Sinks
Countertop models can provide additional surface space but require careful coordination with the supporting vanity or cabinet. The structure underneath must preserve the necessary clearance.
Integrated Sink and Countertops
Integrated designs can provide a continuous surface with fewer seams. They may also offer flexibility in creating a coordinated accessible installation.
The mounting style should be selected according to the project’s space, structural conditions, and accessibility requirements.
9. Review Sink Depth and Projection
The overall depth of a sink affects both reach and maneuverability. A basin that projects too far into the room can reduce usable floor space, particularly in a compact bathroom.
Compare the product’s overall dimensions with the available clear floor area. Consider both the basin and any surrounding countertop or backsplash.
A well-proportioned sink should provide sufficient washing space without unnecessarily restricting movement.
10. Assess the Sink Material
Choose a material that suits the expected level of use and maintenance requirements. Common options include ceramic, vitreous china, solid surface, porcelain, stainless steel, and composite materials.
Consider:
- Resistance to moisture
- Surface durability
- Ease of cleaning
- Resistance to stains and scratches
- Weight and structural support
- Compatibility with cleaning products
The most appropriate material will depend on whether the sink is being installed in a home, hotel, office, healthcare facility, or public building.
11. Consider Durability
Commercial and public bathrooms can expose sinks to frequent use and regular cleaning. The selected fixture should be able to withstand the demands of its environment.
Review the manufacturer’s information regarding impact resistance, surface performance, mounting requirements, and expected maintenance.
For high-traffic installations, durability should be considered alongside appearance and initial cost.
12. Check Cleaning and Maintenance Requirements
Accessible sinks should be easy for maintenance staff to inspect and clean. Smooth surfaces and straightforward plumbing access can simplify routine upkeep.
Review the manufacturer’s recommended cleaning products and procedures. Some abrasive cleaners can damage particular sink finishes.
Also consider whether faucets, drains, and other components can be serviced without significant disruption to the bathroom.
13. Coordinate Nearby Accessories
A sink may meet its dimensional requirements but become difficult to use if nearby accessories block access.
Check the location of:
- Mirrors
- Soap dispensers
- Paper towel dispensers
- Hand dryers
- Waste receptacles
- Shelves and cabinets
- Grab bars and other fixtures
These elements should be coordinated so that they do not obstruct required floor space or create unnecessary reach difficulties.
14. Verify Structural Support
Before selecting a sink, determine how it will be supported. Wall-mounted fixtures require appropriate wall reinforcement and mounting hardware.
Countertop installations need a supporting counter or vanity capable of carrying the fixture and associated loads. The supporting structure should not compromise required knee clearance.
Structural requirements should be coordinated with architectural and construction plans before installation begins.
15. Review Applicable Codes and Standards
The ADA Standards are an important reference for covered facilities, but additional regulations may apply. State and local building codes, plumbing requirements, accessibility regulations, and project-specific standards can affect the final installation.
Do not rely solely on a manufacturer’s claim that a product is “ADA compliant.” Review the actual product dimensions and installation instructions and compare them with the requirements applicable to the project.
16. Inspect the Finished Installation
The final step is to verify the completed installation. Measurements should be checked after flooring, countertops, fixtures, and other construction elements are in place.
Confirm:
- Finished sink height
- Knee and toe clearance
- Clear floor space
- Faucet operation and reach
- Plumbing protection
- Mounting stability
- Accessibility of nearby fixtures
- Absence of unexpected obstructions
A final inspection can identify problems that were not apparent on the original drawings.
Final Checklist
Before approving an accessible sink installation, ask the following:
- Is the finished sink height within the applicable limit?
- Is the required knee and toe clearance available?
- Is the clear floor space unobstructed?
- Can the faucet be operated without excessive force or difficult hand movements?
- Is the faucet within the required reach range?
- Are exposed pipes appropriately protected?
- Is the sink securely supported?
- Does the surrounding layout preserve accessibility?
- Is the material appropriate for the expected use and maintenance routine?
- Does the completed installation comply with all applicable standards and local requirements?
Conclusion
Selecting an accessible bathroom sink is a detailed process that involves much more than choosing the right basin. Height, clearance, faucet operation, plumbing, mounting, materials, and surrounding layout all influence the usability of the finished installation.
Using a checklist during the design and purchasing stages can help project teams identify potential issues early. By verifying the product specifications and completed installation against applicable requirements, they can create bathroom facilities that are practical, durable, and accessible to a broad range of users.


